“SqlDateTime overflow…” exception horror.

Currently, I am involved in developing a client-server multi-layered application that uses NHibernate library as its data access layer. It is designed to support some old legacy database schema. Database is SQL Server 2005. All tables in schema have got two fields which are called CREATE_TIME and UPDATE_TIME. They are both of type datetime nullable in DB schema (btw. our schema contains about 200 tables, which is, in my opinion, A LOT). Their purpose was to describe the time when a certain record was created and when it was updated.

To cope with these fields I created a base class for all mapped entities in our project – a class called BaseEntity:

    public abstract class BaseEntity
    {
        protected int id; // always mapped to primary key
        protected DateTime created;
        protected DateTime updated;

        public BaseEntity() { }

        public virtual int Id
        {
            get { return id; }
            set { this.id = value; }
        }
        public virtual DateTime Created
        {
            set { created = value; }
            get { return created; }
        }
        public virtual DateTime Updated
        {
            set { updated = value; }
            get { return updated; }
        }
    }

The three members of this class were mapped in every NHibernate mapping file (the code below shows a mapping for a Foo class whose base class is, of course, BaseEntity):

<?xml version="1.0" encoding="utf-8" ?>
<hibernate-mapping xmlns="urn:nhibernate-mapping-2.2" assembly="Some.Assembly" namespace="ProjectNamespace.Types">
  <class name="Foo" table="Foo_table">
    
  <id name="Id" type="System.Int32" column="ID_FOO_TABLE" unsaved-value="0">
    <generator class="native" />
  </id>

   <!-- BaseEntity -->
  <property name="created" column="CREATE_TIME" access="field" not-null="false" type="System.DateTime"  insert="true" update="true"/>
  <property name="updated" column="UPDATE_TIME" access="field" not-null="false" type="System.DateTime"  insert="true" update="true"/>
  
  <!-- other properties here... -->
  </class>
</hibernate-mapping>

Everything seemed to work just fine until we populated our database with some real data taken from a production environment. I need to mention here that the tables were very very big (a lot of columns and records – besides the schema is an excellent example of a bad design).
Suddenly, it turned out during tests that a strange exception was caught when users tried to save certain entities. The exception looked like this:
SqlDateTime overflow. Must be between 1/1/1753 12:00:00 AM and 12/31/9999 11:59:59 PM….
However, this exception didn’t appear too often, which made it difficult to debug. It happened only sometimes on NHibernate operations such us session.Merge() or session.Update().
We spent a lot of time trying to figure out what was going on. NHibernate traces were giving a clue that something is wrong with created/updated fields – Nhibernate was trying to persist ‘0001-01-01 00:00:00’ values, which are incorrect values for SQL Server datetime column type.

The explanation is really simple. The database we were given contained a few records whose CREATE_TIME and UPDATE_TIME fields were null. We actually did not care about them – there were more important things to do than storing last modification time in every entity. During merge or update operation NHibernate converted these fields into DateTime.MinValue (which is actually ‘0001-01-01 00:00:00’) and such a value causes SqlDateTime overflow exception when entity is being saved. So the solution is also very simple. It is enough to change created/updated members type to Nullable<DateTime>:

    public abstract class BaseEntity
    {
        // ...
        protected DateTime? created;
        protected DateTime? updated;
        // ...
     }

DataSourceUpdateMode property.

Almost every beginning programmer in MS .NET seems to avoid going deeper into data bindings stuff. Although they are very, very helpful and can reduce the amount of time spent on development, most of the beginners prefer manual initialization of their controls, e.g. by setting EditValue or Text properties. Then, when they need to validate their controls’ data, they write thousands of EditValueChanged handlers.
However, the simplest solution can be found in Binding definition which provides DataSourceUpdateMode property. When it is set to OnPropertyChanged value, it strictly binds the property with the value in the control. Also, DataSourceUpdateMode can be set in Binding constructor.

VS .NET 2008 design mode issue

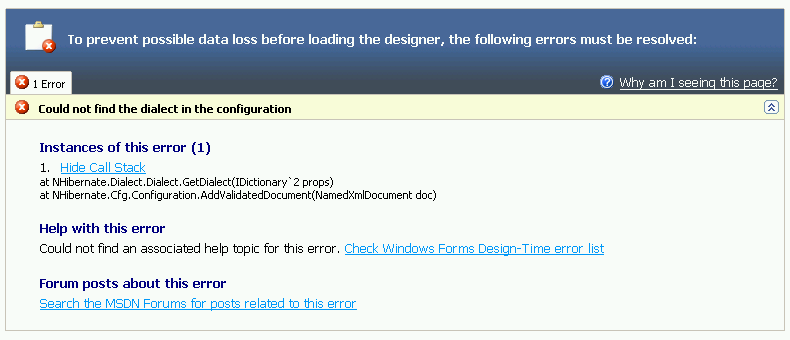
Today I came across a strange issue related to VS .NET 2008 design mode. I was coding a c# stand-alone application whose purpose was to connect to database using NHibernate library. I created a couple of controls which all inherit from DevExpress.XtraEditors.XtraUserControl (btw. I am using DexExpress in this project). The controls were using NHibernate DAOs in order to load data from database. However, when I was trying to edit them in Visual Studio designer I kept getting the following error:

vs_design_mode

Of course, as you may probably have guessed, I have not paid too much attention to catch NHibernate exceptions properly and that is why the exception in the picture above crashes VS designer. Nevertheless, something should be done to handle such issues properly. After a few minutes of google’ing I have found the solution. I put it here, simply because the useful information on the Internet is apt to dissapear quickly:

public class BaseDesignModeUserControl : UserControl
{
private static readonly bool isDesignMode;

static BaseDesignModeUserControl()
{
isDesignMode =
(System.Diagnostics.Process.GetCurrentProcess().
ProcessName.IndexOf("devenv")
!= -1);
}

protected bool IsDesignMode
{
[DebuggerStepThrough]
get
{
return isDesignMode;
}
}

}

SQL Server 2005 issue.

A few days ago I was forced to install and use SQL Server database on my system. A few days later I had to install MS VS .NET 2008. After that, it turned out that the standard utility SQL Server Configuration Manager does not seem to work correctly. It shows a message box that contains the following error:
Cannot connect to WMI provider. You do not have permission or the server is unreachable. Note that you can only manage SQL Server 2005 servers with SQL Server Configuration Manager.
Nie można znaleźć określonego modułu. [0x8007007e]

Unfortunately, I could not find any working solution of this problem (perhaps it is so because my knowledge of Microsoft’s database is less than miserable ) Some pages suggested running Mof-compiler program with *.mof file from SQL Server installation directory but it does not work in my case.

EDIT: After some time I figured out what should done to solve this problem. It is simple. It just requires copying framedyn.dll file from folder: “C:\WINDOWS\system32\wbem” to folder: “C:\WINDOWS\system32”.

How to fix syntax highlighting problem with carrington WP theme?

Recently I have chosen carrington theme as the default theme for this blog. Also, I have decided to make pieces of my code look more attractive and installed syntax-highlighting plugin.
Unfortunately, snippets in my posts did not look attractive at all, as the white lines appeared between lines of code:

wordpress_problem

After intensive searching on the Internet, I’ve found this post. However, it turned out that this solution does not work with carrington blog theme. But fortunately I’ve managed to work this problem out…

What to do? Open css/typography.css file in the theme’s directory and find the following fragment:

li,
dd,
.tight {
	margin-bottom:9px;
}

Everything you need to do is to change 9px value to 0px. This should fix the problem (as you can see in the snippet above).

Hibernate in OSGi bundle

This is my third post about OSGi technology. This time we’re going to do something more advanced. We will create Hibernate-based application working in OSGi bundles. It can be used as a basis for more complex multi-layered SOA killer-app ;-)

In a few words… We will create a Maven project that will consist of two modules. I think that it would be nice to have some kind of a starter for bigger Hibernate applications. That’s why I’m going to separate Hibernate libraries from the mappings and configuration. Both modules are to be packaged as bundles:

  • osgi-hibernate-classes – will be a wrapper bundle for Hibernate JAR and all its dependencies
  • osgi-hibernate-mysql-test – will contain configuration, mappings the application itself

Both these projects will have a common parent POM file.

Parent POM

<?xml version="1.0" encoding="UTF-8"?>
<project xmlns="http://maven.apache.org/POM/4.0.0" xmlns:xsi="http://www.w3.org/2001/XMLSchema-instance"
	xsi:schemaLocation="http://maven.apache.org/POM/4.0.0 http://maven.apache.org/maven-v4_0_0.xsd">
	<modelVersion>4.0.0</modelVersion>
	<groupId>com.lukaszbaran.simpleosgi.db</groupId>
	<artifactId>parent-pom</artifactId>
	<version>1.0</version>
	<packaging>pom</packaging>
	<name>Hibernate on OSGi</name>
	<properties>
		<project.build.sourceEncoding>UTF-8</project.build.sourceEncoding>
	</properties>
	<modules>
		<module>osgi-hibernate-classes</module>
		<module>osgi-hibernate-mysql-test</module>
	</modules>
	<build>
		<plugins>
			<plugin>
				<artifactId>maven-compiler-plugin</artifactId>
				<configuration>
					<source>1.5</source>
					<target>1.5</target>
				</configuration>
			</plugin>
		</plugins>
	</build>
	<dependencies>
		<dependency>
			<groupId>junit</groupId>
			<artifactId>junit</artifactId>
			<version>4.8.2</version>
			<scope>test</scope>
		</dependency>
		<dependency>
			<groupId>mysql</groupId>
			<artifactId>mysql-connector-java</artifactId>
			<version>5.1.6</version>
		</dependency>
		<dependency>
			<groupId>sax</groupId>
			<artifactId>sax</artifactId>
			<version>2.0.1</version>
		</dependency>
		<dependency>
			<groupId>log4j</groupId>
			<artifactId>log4j</artifactId>
			<version>1.2.16</version>
		</dependency>
		<dependency>
			<groupId>org.hibernate</groupId>
			<artifactId>hibernate-annotations</artifactId>
			<version>3.3.0.ga</version>
		</dependency>
		<dependency>
			<groupId>org.hibernate</groupId>
			<artifactId>hibernate-commons-annotations</artifactId>
			<version>3.3.0.ga</version>
		</dependency>
		<dependency>
			<groupId>commons-dbcp</groupId>
			<artifactId>commons-dbcp</artifactId>
			<version>1.2.2</version>
		</dependency>
		<dependency>
			<groupId>javax.persistence</groupId>
			<artifactId>persistence-api</artifactId>
			<version>1.0</version>
		</dependency>
		<dependency>
			<groupId>javax.annotation</groupId>
			<artifactId>jsr250-api</artifactId>
			<version>1.0</version>
		</dependency>
	</dependencies>
</project>

osgi-hibernate-classes module

This wrapper bundle is very simple, as it won’t have any Java code. It will only consist of POM file which should be located in osgi-hibernate-classes sub-directory and look like this:

<?xml version="1.0" encoding="UTF-8"?>
<project xmlns="http://maven.apache.org/POM/4.0.0" xmlns:xsi="http://www.w3.org/2001/XMLSchema-instance"
	xsi:schemaLocation="http://maven.apache.org/POM/4.0.0 http://maven.apache.org/maven-v4_0_0.xsd">
	<modelVersion>4.0.0</modelVersion>
	<parent>
		<groupId>com.lukaszbaran.simpleosgi.db</groupId>
		<artifactId>parent-pom</artifactId>
		<version>1.0</version>
		<relativePath>../pom.xml</relativePath>
	</parent>
	<groupId>com.lukaszbaran.simpleosgi.db</groupId>
	<artifactId>osgi-hibernate-classes</artifactId>
	<packaging>bundle</packaging>
	<version>1.0</version>
	<name>osgi-hibernate-classes</name>
	<build>
		<plugins>
			<plugin>
				<groupId>org.apache.felix</groupId>
				<artifactId>maven-bundle-plugin</artifactId>
				<extensions>true</extensions>
				<version>1.4.3</version>
				<configuration>
					<instructions>
						<manifestLocation>META-INF</manifestLocation>
						<Import-Package>
							org.apache.commons.logging,
							javax.sql,
							javax.naming*,
							org.w3c.*,
							org.xml.sax,
							org.xml.sax.ext,
							org.xml.sax.helpers,
							!*
						</Import-Package>
						<Embed-Transitive>true</Embed-Transitive>
						<Embed-Dependency>*</Embed-Dependency>
						<DynamicImport-Package>
							com.lukaszbaran.simpleosgi.db.test.entities.*
 						</DynamicImport-Package>
						<_exportcontents>
							org.hibernate*
						</_exportcontents>
					</instructions>
				</configuration>
			</plugin>
		</plugins>
	</build>
	<dependencies>
		<dependency>
			<groupId>org.hibernate</groupId>
			<artifactId>hibernate</artifactId>
			<version>3.2.6.ga</version>
			<exclusions>
				<exclusion>
					<groupId>commons-logging</groupId>
					<artifactId>commons-logging</artifactId>
				</exclusion>
			</exclusions>
		</dependency>
	</dependencies>
</project>

The most important part of this POM file is the configuration of maven-bundle-plugin. What we want to achieve is to have Hibernate JARs embedded in an OSGi bundle. There are several ways of achieving our goal. It means that the solution presented here is not the ultimate and best solution. But it’s the working one! Here, we are putting all the JARs necessary for Hibernate into a bundle. The JARs are not be unpacked and they will appear in the main path inside of the bundle. This is achieved by the two sections:

	<Embed-Transitive>true</Embed-Transitive>
	<Embed-Dependency>*</Embed-Dependency>

The * character in Emded-Dependency tells plugin to include all dependencies from POM file (of course, it includes dependencies from our parent POM). The Embed-Transitive section causes that all the transitive dependencies will be included as well.

Another important point is Import-Package. This is where we declare what other (external) packages will be referenced by our code. In other words, all external dependencies have to be listed here.

OK, now comes the most tricky part in this tutorial – the packages that our wrapper will be exposing to other bundles. In this case we want to expose Hibernate to other bundles. To achieve this we can use Export-Package, but it may complicate things as we don’t want to have the classes inlined in the bundle [inlined means here *.class files taken out of JAR and put in the bundle’]. That’s why we’re using little documented feature of the maven-bundle-plugin called <_exportcontents> – it will place all the sub-packages of given packages in exported packages section in MANIFEST file.

Another thing worth mentioning is the way the Hibernate dependency is declared in POM dependencies part. We manually exlude one of its transitive dependencies – commons-logging, as we will be using this dependency from FUSE ESB’s bundles. This reduces the final size of the resulting bundle. Btw, I’m pretty sure that it is possible to make this bundle even smaller..

osgi-hibernate-mysql-test module

Now, let’s prepare a sample application that will use of the wrapper bundle. We’ll use MySQL table which could like this:

 CREATE TABLE IF NOT EXISTS `honey` (
  `id` int(11) NOT NULL auto_increment,
  `name` varchar(250) default NULL,
  `taste` varchar(250) default NULL,
  PRIMARY KEY  (`id`)
 ) ENGINE=MyISAM  DEFAULT CHARSET=latin1 AUTO_INCREMENT=1;

What we need is POJO representation of the honey table, Hibernate configuration and the code that will make use of it.

The project structure will look like this:

│   pom.xml
│
└───src
    ├───main
    │   ├───java
    │   │   └───com
    │   │       └───lukaszbaran
    │   │           └───simpleosgi
    │   │               └───db
    │   │                   └───test
    │   │                       ├───entities
    │   │                       │       Honey.java
    │   │                       │
    │   │                       └───osgi
    │   │                               Activator.java
    │   │                               BundleUtils.java
    │   │                               HibernateApplication.java
    │   │
    │   └───resources
    │           hibernate.cfg.xml
    │           Honey.hbm.xml
    │           log4j.properties
    │
    └───test
        └───java

The POM file for the project will be really simple:

<project xmlns="http://maven.apache.org/POM/4.0.0" xmlns:xsi="http://www.w3.org/2001/XMLSchema-instance"
	xsi:schemaLocation="http://maven.apache.org/POM/4.0.0 http://maven.apache.org/maven-v4_0_0.xsd">
	<modelVersion>4.0.0</modelVersion>
	<parent>
		<groupId>com.lukaszbaran.simpleosgi.db</groupId>
		<artifactId>parent-pom</artifactId>
		<version>1.0</version>
		<relativePath>../pom.xml</relativePath>
	</parent>
	<groupId>com.lukaszbaran.simpleosgi.db</groupId>
	<artifactId>osgi-hibernate-mysql-test</artifactId>
	<packaging>bundle</packaging>
	<version>1.0</version>
	<name>osgi-hibernate-mysql-test</name>
	<build>
		<plugins>
			<plugin>
				<groupId>org.apache.felix</groupId>
				<artifactId>maven-bundle-plugin</artifactId>
				<extensions>true</extensions>
				<version>1.4.3</version>
				<configuration>
					<instructions>
						<manifestLocation>META-INF</manifestLocation>
						<Import-Package>
							org.osgi.framework,
							org.hibernate,
							org.hibernate.cfg,
							org.hibernate.classic,
							javax.*,
							org.w3c.dom,
							org.xml.sax,
							org.apache.log4j
						</Import-Package>
						<Private-Package>
							com.lukaszbaran.simpleosgi.db.test.osgi.*
						</Private-Package>
						<Export-Package>
							com.lukaszbaran.simpleosgi.db.test.entities.*
						</Export-Package>
						<Bundle-Activator>
							com.lukaszbaran.simpleosgi.db.test.osgi.Activator
						</Bundle-Activator>
						<DynamicImport-Package>
							org.hibernate.proxy.*
						</DynamicImport-Package>
						<Require-Bundle>
							com.lukaszbaran.simpleosgi.db.osgi-hibernate-classes
						</Require-Bundle>
					</instructions>
				</configuration>
			</plugin>
		</plugins>
	</build>
	<dependencies>
		<dependency>
			<groupId>org.hibernate</groupId>
			<artifactId>hibernate</artifactId>
			<version>3.2.6.ga</version>
		</dependency>
		<dependency>
			<groupId>org.apache.felix</groupId>
			<artifactId>org.osgi.core</artifactId>
			<version>1.0.0</version>
			<scope>provided</scope>
		</dependency>
		<dependency>
			<groupId>commons-logging</groupId>
			<artifactId>commons-logging</artifactId>
			<version>1.1.1</version>
		</dependency>
	</dependencies>
</project>

The configuration of Bundle plugin may seem a little bit complicated but in fact it’s just a compilation of previous tutorials. We’re declaring that we require our wrapper bundle named: com.lukaszbaran.simpleosgi.db.osgi-hibernate-classes. The only package exported from this bundle is com.lukaszbaran.simpleosgi.db.test.entities – it is where we have our Honey POJO.

This POJO looks like this (it’s really nihil novum sub sole):

package com.lukaszbaran.simpleosgi.db.test.entities;
public class Honey {
	private Integer id;
	private String name;
	private String taste;
 	public Honey() {}
 
	public Integer getId() {
		return id;
	}

	public void setId(Integer id) {
		this.id = id;
	}
	
	public String getName() {
		return name;
	}
	
	public void setName(String name) {
		this.name = name;
	}
	
	public String getTaste() {
		return taste;
	}

	public void setTaste(String taste) {
		this.taste = taste;
	}
	
	@Override
	public String toString() {
		return "id=" + getId() + " \tname=" + getName() + " \ttaste=" + getTaste();
	}
}

The Hibernate mapping (Honey.hbm.xml):

<?xml version="1.0" encoding="UTF-8"?>
<hibernate-mapping>
	<class name="com.lukaszbaran.simpleosgi.db.test.entities.Honey" table="honey">
		<id name="id" column="id" type="java.lang.Integer">
			<generator class="increment"/>
		</id>
		<property name="name" column="name" type="java.lang.String"/>
		<property name="taste" column="taste" type="java.lang.String"/>
	</class>
</hibernate-mapping>

hibernate.cfg.xml file:

<?xml version='1.0' encoding='UTF-8'?>
<!DOCTYPE hibernate-configuration PUBLIC "-//Hibernate/Hibernate Configuration DTD 3.0//EN"
	"http://hibernate.sourceforge.net/hibernate-configuration-3.0.dtd">
<hibernate-configuration>
	<session-factory>
		<property name="hibernate.connection.driver_class">
			com.mysql.jdbc.Driver</property>
		<property name="hibernate.connection.url">
			jdbc:mysql://localhost/firsthibernate</property>
		<property name="hibernate.connection.username">root</property>
		<property name="hibernate.connection.password">password</property>
		<property name="hibernate.connection.pool_size">10</property>
		<property name="show_sql">true</property>
		<property name="dialect">org.hibernate.dialect.MySQLDialect</property>
		<property name="hibernate.hbm2ddl.auto">update</property>
	</session-factory>
</hibernate-configuration>

Eventually, we have three Java classes that form our application:

Activator.java this class should only store reference to the bundle in BundleUtils instance, however, I’ve decided to run the test method here:

package com.lukaszbaran.simpleosgi.db.test.osgi;
import org.apache.log4j.Logger;
import org.osgi.framework.BundleActivator;
import org.osgi.framework.BundleContext;
public class Activator implements BundleActivator {
	private static final Logger LOGGER = Logger.getLogger(Activator.class);
	public void start(BundleContext arg0) throws Exception {
		LOGGER.info("Activator start() START");
		
		// because we need to access to the current bundle elsewhere
		if (arg0 != null) {
			BundleUtils.getInstance().setBundle(arg0.getBundle());
		}

		// perform some test connection
		HibernateApplication app = new HibernateApplication();
		app.test();
		LOGGER.info("Activator start() END");
	}
	public void stop(BundleContext arg0) throws Exception {
		LOGGER.info("Activator stop()");
	}
}

HibernateApplication.java configures Hibernate library using the config files that are embedded in the bundle and it invokes simple database access test:

package com.lukaszbaran.simpleosgi.db.test.osgi;
import java.util.Iterator;
import java.util.List;
import org.apache.log4j.Logger;
import org.hibernate.Session;
import org.hibernate.SessionFactory;
import org.hibernate.cfg.Configuration;
import com.lukaszbaran.simpleosgi.db.test.entities.Honey;
public class HibernateApplication {
	private static final Logger LOGGER = Logger.getLogger(HibernateApplication.class);
	public HibernateApplication() {	}

	@SuppressWarnings("unchecked")
	public void test() throws Exception {
		LOGGER.info("Application test() START");
		Session session = null;
		try {
			Configuration cfg = new Configuration();
			cfg.configure(BundleUtils.getInstance().loadResourceURL("/hibernate.cfg.xml"));
			cfg.addDocument(BundleUtils.getInstance().loadResourceXML("/Honey.hbm.xml"));
			SessionFactory sessionFactory = cfg.buildSessionFactory();
			session = sessionFactory.openSession();
			List<Honey> list = session.createCriteria(Honey.class).list();
			for (Iterator<Honey> iter = list.iterator(); iter.hasNext();) {
				Honey element = iter.next();
				LOGGER.debug(element);
			}
			session.close();
		} catch (Exception bhe) {
			LOGGER.error("Exception caught: ", bhe);
			throw bhe;
		} 
	}
}

BundleUtils.java is an ugly singleton class (it really should be done other way as I guess it is against the notion of OSGi) but this code was not the most important part of the show. We only needed to store a reference to a bundle somewhere. Besides that, the class provides methods to access bundle resources:

package com.lukaszbaran.simpleosgi.db.test.osgi;
import java.io.IOException;
import java.io.InputStream;
import java.net.URL;
import javax.xml.parsers.DocumentBuilder;
import javax.xml.parsers.DocumentBuilderFactory;
import javax.xml.parsers.ParserConfigurationException;
import org.osgi.framework.Bundle;
import org.w3c.dom.Document;
import org.xml.sax.SAXException;
public class BundleUtils {
	private static BundleUtils instance = null; 
	private Bundle bundle;
        private final DocumentBuilder builder;
	private BundleUtils() {
	    DocumentBuilderFactory factory = DocumentBuilderFactory.newInstance();
	    factory.setNamespaceAware(true);
	    try {
	        builder = factory.newDocumentBuilder();
	    } catch (ParserConfigurationException ex) {
	    	throw new RuntimeException("Unable to instantiate DocumentBuilder.", ex);
	    }		
	}
	public static synchronized BundleUtils getInstance() {
		if (instance == null)
			instance = new BundleUtils();
		return instance;
	}
	public Bundle getBundle() {
		return bundle;
	}
	public void setBundle(Bundle bundle) {
		this.bundle = bundle;
	}
	public Document loadResourceXML(final String resourceName) {
	    URL url = loadResourceURL(resourceName);
		try {
			InputStream is = url.openStream();
			return builder.parse(is);
		} catch (SAXException e) {
	    	throw new RuntimeException("Unable to parse resource.", e);
		} catch (IOException e) {
	    	throw new RuntimeException("IO exception while parsing resource.", e);
		}
	}
	public URL loadResourceURL(final String resourceName) {
	    URL url = null;
		if (bundle == null) { 
			url = this.getClass().getResource(resourceName);
		} else {
			url = bundle.getResource(resourceName);
		}
		if (url == null) {
			throw new RuntimeException("Unable to access resource.");
		}
		return url;
	}		
}

osgi-hibernate.zip contains all the source code presented here.

Summary

Of course, you can now build those two bundles and deploy them into FUSE ESB container (I guess it would be better to start with deploying Hibernate wrapper bundle in the first place). If your MySQL database is properly configured and if there was anything in the honey table, you would see some results in data/log/servicemix.log file.

Simple database connection in OSGi bundle

This short tutorial follows the topic of my previous post which concerned creation of OSGi bundles. This time we are going to create a simple OSGi bundle able to connect to a database (in our case it would be MySQL) using JDBC. However, the way it is accomplished here should not be considered as the right approach, because I do not think that anyone would use BundleActivator for anything but initialization of the bundle. So, please consider this tutorial only as a sample showing how BundleActivator works.

Project POM

The first steps (project creation and setup etc.) are identical as in the previous case. The project will be created using the following Maven command.

mvn -B archetype:generate \
-DarchetypeGroupId=org.apache.maven.archetypes \
-DarchetypeArtifactId=maven-archetype-quickstart \
-DarchetypeVersion=1.0 \
-DgroupId=com.lukaszbaran.simpleosgi.db \
-DartifactId=osgi-simple-db -Dversion=1.0

However, the POM file is quite different than previously because we are not using Spring Dynamic Modules (to show that it is not necessary). So, again, just replace the generated POM with this code:

<?xml version="1.0" encoding="UTF-8"?>
<project xmlns="http://maven.apache.org/POM/4.0.0"
	xsi:schemaLocation="http://maven.apache.org/POM/4.0.0 http://maven.apache.org/maven-v4_0_0.xsd"
	xmlns:xsi="http://www.w3.org/2001/XMLSchema-instance">
	<modelVersion>4.0.0</modelVersion>
	<groupId>com.lukaszbaran.simpleosgi.db</groupId>
	<artifactId>osgi-simple-db</artifactId>
	<packaging>bundle</packaging>
	<version>1.0</version>
	<name>osgi-simple-db</name>
	<url>http://maven.apache.org</url>
	<build>
		<plugins>
			<plugin>
				<groupId>org.apache.felix</groupId>
				<artifactId>maven-bundle-plugin</artifactId>
				<extensions>true</extensions>
				<version>1.4.0</version>
				<configuration>
					<instructions>
						<manifestLocation>META-INF</manifestLocation>
						<_include>-osgi.bnd</_include>
					</instructions>
				</configuration>
			</plugin>
			<plugin>
				<groupId>org.apache.maven.plugins</groupId>
				<artifactId>maven-surefire-plugin</artifactId>
				<version>2.4.2</version>
				<configuration>
					<skipTests>true</skipTests>
				</configuration>
			</plugin>
			<plugin>
				<artifactId>maven-compiler-plugin</artifactId>
				<configuration>
					<source>1.5</source>
					<target>1.5</target>
				</configuration>
			</plugin>
		</plugins>
	</build>
	<dependencies>
		<dependency>
			<groupId>junit</groupId>
			<artifactId>junit</artifactId>
			<version>3.8.1</version>
			<scope>test</scope>
		</dependency>
		<dependency>
			<groupId>org.apache.felix</groupId>
			<artifactId>org.osgi.core</artifactId>
			<version>1.0.0</version>
			<scope>provided</scope>
		</dependency>
		<dependency>
			<groupId>mysql</groupId>
			<artifactId>mysql-connector-java</artifactId>
			<version>5.1.6</version>
		</dependency>
	</dependencies>
</project>

Code

Before we go further, let us assume that we have got the simplest MySQL database possible. Let’s assume that the db name will be testdb. It would contain only one table whose DDL definition looks as follows:

CREATE TABLE IF NOT EXISTS `names` (
  `id` int(11) NOT NULL AUTO_INCREMENT,
  `name` varchar(255) NOT NULL,
  PRIMARY KEY (`id`)
) ENGINE=InnoDB DEFAULT CHARSET=latin1 AUTO_INCREMENT=1;

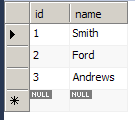
The table may filled with the following data (of course, it really does not matter):

Sample data

It is time to create the actual code of our bundle. We need only two classes: com.lukaszbaran.simpleosgi.db.Application and com.lukaszbaran.simpleosgi.db.Activator. As it can be read in OSGi specification, Activator class is responsible for bundle initialization and destruction. In our case it is responsible for invoking our database code, which is located in Application class. Of course, both these classes are as simple as possible. Note: Remember about proper MySQL settings in Application.java (which are: dbUrl, dbUser, dbPassword).

package com.lukaszbaran.simpleosgi.db;

import java.sql.Connection;
import java.sql.DriverManager;
import java.sql.ResultSet;
import java.sql.SQLException;
import java.sql.Statement;
import com.mysql.jdbc.Driver;

public class Application {

	private static final String dbUrl = "jdbc:mysql://localhost:3306/testdb";
	private static final String dbUser = "youruser";
	private static final String dbPassword = "yourpassword";

	public Application() {
	}

	public void doStuff() {
		Statement stmt = null;
		String driverName = Driver.class.getName();
		Connection con = null;
		try {
			Class.forName(driverName);
			con = DriverManager.getConnection(dbUrl, dbUser, dbPassword);
			stmt = con.createStatement();

			ResultSet rs = stmt.executeQuery("SELECT * FROM names");
			while (rs.next()) {
				int id = rs.getInt("id");
				String name = rs.getString("name");
				System.out.println("\tid= " + id + "\tname = " + name);
			}
			con.close();
		} catch (ClassNotFoundException e) {
			// TODO Auto-generated catch block
			e.printStackTrace();
		} catch (SQLException e) {
			// TODO Auto-generated catch block
			e.printStackTrace();
		}
	}

}
package com.lukaszbaran.simpleosgi.db;

import org.osgi.framework.BundleActivator;
import org.osgi.framework.BundleContext;

public class Activator implements BundleActivator {

	@Override
	public void start(BundleContext arg0) throws Exception {
		Application app = new Application();
		app.doStuff();
	}

	@Override
	public void stop(BundleContext arg0) throws Exception {
	}
}

The most important part…

This time osgi.bnd file is a little bit sophisticated and, in fact, the most important part of the bundle creation process:

Import-Package: org.osgi.framework, javax.*, org.w3c.dom, org.xml.*, org.apache.commons.logging, org.apache.log4j, !com.mchange.v2.c3p0, !org.jboss.resource.adapter.jdbc, !org.jboss.resource.adapter.jdbc.vendor 

Embed-Dependency: *

Embed-Transitive: true

Private-Package: *

Bundle-Activator: com.lukaszbaran.simpleosgi.db.Activator

Please notice that in the last line we explicitly specify which class will be our BundleActivator. That is the most important thing we are learning in this tutorial. Traditionally, we compile the project with mvn clean package command and copy osgi-simple-db-1.0.jar to deploy directory of Fuse ESB. Immediately after that, we should see our output in the ServiceMix console:

id= 1     name = Smith
id= 2     name = Ford
id= 3     name = Andrews

Web service in OSGi bundle

In this short tutorial we will create OSGi bundle that will expose web service using CXF library. Like it or not, but the project will be created with usage of Maven utility. Also, this example will be using Spring Dynamic Modules.

Project

Let us start with creating an empty project. We will do it using archetype:generate:

mvn -B archetype:generate \
-DarchetypeGroupId=org.apache.maven.archetypes \
-DarchetypeArtifactId=maven-archetype-quickstart \
-DarchetypeVersion=1.0 \
-DgroupId=com.lukaszbaran.simpleosgi.ws \
-DartifactId=osgi-simple-ws -Dversion=1.0

After execution of this command, Maven should generate project structure. Delete the classes AppMain and AppTest. To make the project simpler to edit, generate Eclipse project files:

mvn eclipse:eclipse

Code & configuration

The next step is to create the interface and its implementation (don’t forget about packages as well):

 // ICalculator.java
 package com.lukaszbaran.simpleosgi.ws;
 import javax.jws.WebService;
 @WebService
 public interface ICalculator {
    int add(int a, int b);
    int sub(int a, int b);
 }

Service implementation (CalculatorImpl.java) is created in com.lukaszbaran.simpleosgi.ws.impl package:

// CalculatorImpl.java
package com.lukaszbaran.simpleosgi.ws.impl;
public class CalculatorImpl implements ICalculator {
	@Override
	public int add(int a, int b) {
		return a + b;
	}
	@Override
	public int sub(int a, int b) {
		return a - b;
	}
}

Since the project is going to use Spring Dynamic Modules, it is necessary to create beans.xml file in src / main / resources / META-INF / spring / beans.xml path. The file should look like this:

<?xml version="1.0" encoding="UTF-8"?>
<beans xmlns="http://www.springframework.org/schema/beans"
 xmlns:xsi="http://www.w3.org/2001/XMLSchema-instance"
 xmlns:jaxws="http://cxf.apache.org/jaxws"
 xsi:schemaLocation="http://www.springframework.org/schema/beans http://www.springframework.org/schema/beans/spring-beans.xsd
  http://cxf.apache.org/jaxws http://cxf.apache.org/schemas/jaxws.xsd">
	<import resource="classpath:META-INF/cxf/cxf.xml"/>
	<import resource="classpath:META-INF/cxf/cxf-extension-soap.xml"/>
	<import resource="classpath:META-INF/cxf/cxf-extension-http.xml"/>
	<import resource="classpath:META-INF/cxf/osgi/cxf-extension-osgi.xml"/>
 <jaxws:endpoint
  id="calculator"
  implementor="com.lukaszbaran.simpleosgi.ws.impl.CalculatorImpl"
  address="/calculator"/>
</beans>

This file defines the address of our end-point and and points the class which implements service interface.

POM

The next step is to create pom.xml file that will be used to build our project (of course, if you were doing this tutorial from the beginning, the only thing you need to do is to copy build section from the following XML into your POM).

<project xmlns="http://maven.apache.org/POM/4.0.0"
	xmlns:xsi="http://www.w3.org/2001/XMLSchema-instance"
	xsi:schemaLocation="http://maven.apache.org/POM/4.0.0 http://maven.apache.org/maven-v4_0_0.xsd">
	<modelVersion>4.0.0</modelVersion>
	<groupId>com.lukaszbaran.simpleosgi.ws</groupId>
	<artifactId>osgi-simple-ws</artifactId>
	<packaging>bundle</packaging>
	<version>1.0</version>
	<name>osgi-simple-ws</name>
	<url>http://maven.apache.org</url>
	<build>
		<plugins>
			<plugin>
				<groupId>org.apache.maven.plugins</groupId>
				<artifactId>maven-compiler-plugin</artifactId>
				<configuration>
					<source>1.5</source>
					<target>1.5</target>
				</configuration>
			</plugin>
			<plugin>
				<groupId>org.apache.felix</groupId>
				<artifactId>maven-bundle-plugin</artifactId>
				<extensions>true</extensions>
				<version>1.4.0</version>
				<configuration>
					<instructions>
						<manifestLocation>META-INF</manifestLocation>
						<_include>-osgi.bnd</_include>
					</instructions>
				</configuration>
			</plugin>
		</plugins>
	</build>
	<dependencies>
		<dependency>
			<groupId>junit</groupId>
			<artifactId>junit</artifactId>
			<version>3.8.1</version>
			<scope>test</scope>
		</dependency>
	</dependencies>
</project>

As you can see, in the code above we configured maven-bundle-plugin, so that it would use configuration from osgi.bnd file.  It should be created in the same directory as pom.xml file:

Import-Package: javax.jws, javax.wsdl, META-INF.cxf, META-INF.cxf.osgi, org.apache.cxf.bus, org.apache.cxf.bus.spring, org.apache.cxf.bus.resource, org.apache.cxf.configuration.spring, org.apache.cxf.resource, org.apache.servicemix.cxf.transport.http_osgi, org.springframework.beans.factory.config 

Private-Package: com.lukaszbaran.simpleosgi.ws.*

Require-Bundle: org.apache.cxf.cxf-bundle

Compilation & installation

The project should be compiled by executing:

mvn clean package

If everything has been done correctly, the bundle should be now in the target directory. To make our bundle running in OSGi environment (in our case it would be Fuse ESB) we should take care of installing cxf-osgi feature (feature is simply a pack of bundles). In Fuse ESB we do it using the following command:

features install cxf-osgi

Note: if you do not do this you may get some strange exceptions like this one:

org.osgi.framework.BundleException:
 Unresolved constraint in bundle 154:package;
 (package=META-INF.cxf.osgi)

Now we can install our bundle in the container (e.g. by copying to the container’s deploy directory). Service may be accessed by opening URL: http://localhost:8080/cxf/calculator?wsdl (assuming the default configuration).