
This short tutorial follows the topic of my previous post which concerned creation of OSGi bundles. This time we are going to create a simple OSGi bundle able to connect to a database (in our case it would be MySQL) using JDBC. However, the way it is accomplished here should not be considered as the right approach, because I do not think that anyone would use BundleActivator for anything but initialization of the bundle. So, please consider this tutorial only as a sample showing how BundleActivator works.
Project POM
The first steps (project creation and setup etc.) are identical as in the previous case. The project will be created using the following Maven command.
mvn -B archetype:generate \
-DarchetypeGroupId=org.apache.maven.archetypes \
-DarchetypeArtifactId=maven-archetype-quickstart \
-DarchetypeVersion=1.0 \
-DgroupId=com.lukaszbaran.simpleosgi.db \
-DartifactId=osgi-simple-db -Dversion=1.0
However, the POM file is quite different than previously because we are not using Spring Dynamic Modules (to show that it is not necessary). So, again, just replace the generated POM with this code:
<?xml version="1.0" encoding="UTF-8"?>
<project xmlns="http://maven.apache.org/POM/4.0.0"
	xsi:schemaLocation="http://maven.apache.org/POM/4.0.0 http://maven.apache.org/maven-v4_0_0.xsd"
	xmlns:xsi="http://www.w3.org/2001/XMLSchema-instance">
	<modelVersion>4.0.0</modelVersion>
	<groupId>com.lukaszbaran.simpleosgi.db</groupId>
	<artifactId>osgi-simple-db</artifactId>
	<packaging>bundle</packaging>
	<version>1.0</version>
	<name>osgi-simple-db</name>
	<url>http://maven.apache.org</url>
	<build>
		<plugins>
			<plugin>
				<groupId>org.apache.felix</groupId>
				<artifactId>maven-bundle-plugin</artifactId>
				<extensions>true</extensions>
				<version>1.4.0</version>
				<configuration>
					<instructions>
						<manifestLocation>META-INF</manifestLocation>
						<_include>-osgi.bnd</_include>
					</instructions>
				</configuration>
			</plugin>
			<plugin>
				<groupId>org.apache.maven.plugins</groupId>
				<artifactId>maven-surefire-plugin</artifactId>
				<version>2.4.2</version>
				<configuration>
					<skipTests>true</skipTests>
				</configuration>
			</plugin>
			<plugin>
				<artifactId>maven-compiler-plugin</artifactId>
				<configuration>
					<source>1.5</source>
					<target>1.5</target>
				</configuration>
			</plugin>
		</plugins>
	</build>
	<dependencies>
		<dependency>
			<groupId>junit</groupId>
			<artifactId>junit</artifactId>
			<version>3.8.1</version>
			<scope>test</scope>
		</dependency>
		<dependency>
			<groupId>org.apache.felix</groupId>
			<artifactId>org.osgi.core</artifactId>
			<version>1.0.0</version>
			<scope>provided</scope>
		</dependency>
		<dependency>
			<groupId>mysql</groupId>
			<artifactId>mysql-connector-java</artifactId>
			<version>5.1.6</version>
		</dependency>
	</dependencies>
</project>
Code
Before we go further, let us assume that we have got the simplest MySQL database possible. Let’s assume that the db name will be testdb. It would contain only one table whose DDL definition looks as follows:
CREATE TABLE IF NOT EXISTS `names` (
  `id` int(11) NOT NULL AUTO_INCREMENT,
  `name` varchar(255) NOT NULL,
  PRIMARY KEY (`id`)
) ENGINE=InnoDB DEFAULT CHARSET=latin1 AUTO_INCREMENT=1;
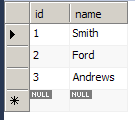
The table may filled with the following data (of course, it really does not matter):
It is time to create the actual code of our bundle. We need only two classes: com.lukaszbaran.simpleosgi.db.Application and com.lukaszbaran.simpleosgi.db.Activator. As it can be read in OSGi specification, Activator class is responsible for bundle initialization and destruction. In our case it is responsible for invoking our database code, which is located in Application class. Of course, both these classes are as simple as possible. Note: Remember about proper MySQL settings in Application.java (which are: dbUrl, dbUser, dbPassword).
package com.lukaszbaran.simpleosgi.db;

import java.sql.Connection;
import java.sql.DriverManager;
import java.sql.ResultSet;
import java.sql.SQLException;
import java.sql.Statement;
import com.mysql.jdbc.Driver;

public class Application {

	private static final String dbUrl = "jdbc:mysql://localhost:3306/testdb";
	private static final String dbUser = "youruser";
	private static final String dbPassword = "yourpassword";

	public Application() {
	}

	public void doStuff() {
		Statement stmt = null;
		String driverName = Driver.class.getName();
		Connection con = null;
		try {
			Class.forName(driverName);
			con = DriverManager.getConnection(dbUrl, dbUser, dbPassword);
			stmt = con.createStatement();

			ResultSet rs = stmt.executeQuery("SELECT * FROM names");
			while (rs.next()) {
				int id = rs.getInt("id");
				String name = rs.getString("name");
				System.out.println("\tid= " + id + "\tname = " + name);
			}
			con.close();
		} catch (ClassNotFoundException e) {
			// TODO Auto-generated catch block
			e.printStackTrace();
		} catch (SQLException e) {
			// TODO Auto-generated catch block
			e.printStackTrace();
		}
	}

}
package com.lukaszbaran.simpleosgi.db;

import org.osgi.framework.BundleActivator;
import org.osgi.framework.BundleContext;

public class Activator implements BundleActivator {

	@Override
	public void start(BundleContext arg0) throws Exception {
		Application app = new Application();
		app.doStuff();
	}

	@Override
	public void stop(BundleContext arg0) throws Exception {
	}
}
The most important part…
This time osgi.bnd file is a little bit sophisticated and, in fact, the most important part of the bundle creation process:
Import-Package: org.osgi.framework, javax.*, org.w3c.dom, org.xml.*, org.apache.commons.logging, org.apache.log4j, !com.mchange.v2.c3p0, !org.jboss.resource.adapter.jdbc, !org.jboss.resource.adapter.jdbc.vendor

Embed-Dependency: *

Embed-Transitive: true

Private-Package: *

Bundle-Activator: com.lukaszbaran.simpleosgi.db.Activator
Please notice that in the last line we explicitly specify which class will be our BundleActivator. That is the most important thing we are learning in this tutorial. Traditionally, we compile the project with mvn clean package command and copy osgi-simple-db-1.0.jar to deploy directory of Fuse ESB. Immediately after that, we should see our output in the ServiceMix console:
id= 1     name = Smith
id= 2     name = Ford
id= 3     name = Andrews